New Travel Top, New Friends

This morning I met up with Brian H. and made a run down into Annapolis to pick up a Traveltop. I was a bit hung over, but Peer Pressure fired right up and made the trip easy. After meeting the seller at his house, we wound up talking to him for a good hour and a half before we started turning wrenches. It turns out he’s been buying and parting out trucks for the past couple of years, and he wants to thin his collection out a little.

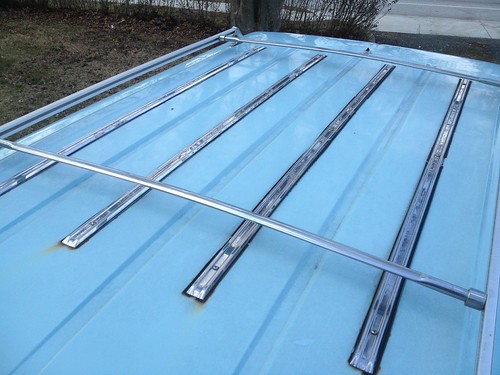
New travel top

This top is in really good shape. It’s baby blue with a roof rack, and apart from some minor rust issues under the driver’s window and leaks where the chrome strips sit on the top, it’s clean. The liftgate is in fantastic shape, the handle works perfectly, and the glass is all good. I’m going to pull the sliders out of my spare top and replace these as well as the seals, and maybe weld up a lot of the holes before painting it white.

New travel top

He threw in a set of Kayline bows he had laying around, and I picked up a spare windshield with a tiny crack in the side as well. We made sure to invite him up to the next wrenching day in the springtime, and hopefully we can get a couple of other locals to meet up when the weather gets warmer.

New travel top

Thoughts on Paint.

Colorado Mike has been feeding me steady updates on his resto project via text. The other day he asked me for paint advice, and I sent him my collection of IH paint codes for the entire Scout II run. He’s leaning towards Lexington Blue, a bright shade offered in 1979. It got me thinking about the distant future, when I can strip Peer Pressure down to the metal, POR-15 everything, and paint it in a more pleasing color. Originally I wanted a shade of English green, but Mr. Scout has that one covered. My second choice is a color from the Scout in a movie called “Fools Rush In”. Based on the grille pattern, it’s a ’75 or a ’76, which could only make the color Glacier Blue (it’s the only light blue offered in the ’74-’77 timespan). Looking at the paint chip, it’s a light, flat blue which looks too powdery at first glance.

It could be the film transfer, the lighting, or wear and tear on the truck, but the blue here looks darker to me.

The other candidate is a shade called Bimini Blue Poly, which is a darker blue with candyflake. I can’t find a good example online, but I’ll keep looking.

Mirror Measurement

For Mike, here are some rough measurements for stock rearview mirrors (the round kind) on the driver’s door. These measurements were made on a set of spare Terra doors I have socked away in the garage. The holes we’re looking at are the two farthest apart on the outside–the ones on the inside were made after the truck left the factory.

Drawing a line straight down from the rear edge of the butterfly frame, the front hole is 4″ ahead of the line and the rear hole is 1 3/4″ behind. Drawing another line straight through the middle of the two holes, when I put a tape on the bend at the top of the door, the holes are roughly 2 1/4″ below that point.

For an alternate measurement, I started the tape at the very top of the door above the handle and brought it forward. The front hole is at 32 3/4″ and the rear hole is at 27″.

Another good way to double-check these measurements is to pull the glass out of the door and see where the holes come through on the inside; there’s a welded backing plate on the inside of the door skin that should confirm/narrow my measurements.

Update:

My Scout (a 1976 of unknown pedigree) features mounts that are completely different. It turns out the backing plate is moved back about 3″ and isn’t as wide as the one on my spare doors, so I can’t mount the OEM mirror I have on the shelf without drilling into non-reinforced doorskin. The original holes in the plate I have measure roughly 3″ apart. There’s no lower plate provision for a western-style mount, or filled holes from a previous install.

nasty mirror mount
For reference, the OEM bolt hole is the one in the center of the Bondo patch.


Posted on   |     |   1 Comment on Mirror Measurement  |  Posted in Friends

We Need Some Stinkin’ Badges.

I got a Facebook message from Mike in Colorado the other day, who said he’d found a local junkyard and scored a pile of Scout badges for his resto project. He asked me if I needed anything, and I told him I was looking for a set myself; Peer Pressure was clean-shaven when I got her (minus one IH badge on the driver’s fender). Lo and behold, look what appeared on my doorstep yesterday afternoon:

We need some stinkin badges

The real miracle is that ALL of them still have their mounting posts. Getting pot-metal badges off without breaking them is something akin to magic; he was able to keep them all intact. Now I must find a suitable gift to send in return….

Bumper Building, Day 4

It’s about time for an update! And yes, I’m starting this off with another bridge picture:

On the way over the bridge

When last we left off, the welder couldn’t meet up with us, so we got a bunch of welds cleaned up, drilled holes for seatbelt mounts, and other smaller tasks accomplished. This Sunday I made it over the river by 10:15 and we were backing up to his shop by 11.

The first task was to mount up the swingarm. We clamped some plate to the top of the bumper, moved things back and forth and up and down, and finally found the right spot. He fired up the welder and got to work.

Prelim welding

Once that was in place, we greased and assembled the swingarm cups and bearings, pressed them in with a socket, and set it onto the spindle. Not bad!

castle nut

There’s a droop of maybe 1/2″ on the far side of the hinge, and even after torquing the castle nut down just a hair of vertical play in the arm.

Moving the swingarm

I wasn’t concerned about the droop all that much, because the next part was welding a receiver to the other side. After lots of consultation, we decided to cut a flat plate and weld that to the face of the bumper, and then weld a section of angle iron to that to act as the shelf it sits on:

That's beefy

While that was cooling down, I had him weld my seatbelt bungs into the rollbar, the spare tire plate onto the standoff, the bolts for the Hi-Lift to the bumper, and the bolts for the spare.

Then, we pulled the whole bumper off to weld two plates of angle iron in behind the outer bumper mounting holes–one side to the frame and the other to the flat plate across the back of the frame. This should provide support for the weight of the tire and bumper.

Setting up to strengthen the frame

Frame supports

Once that was all done, we threw everything into the back of the truck, paid the man, and headed back to Brian’s place. There we drilled out the mounting holes for the bumper, put that back in, mounted the swingarm, and tested the height of the receiver on the tailgate: too high! We had to chop about 1″ off the top of the receiver to clear the tailgate as it came down all the way, but there’s still plenty of backstop left to keep the arm from hitting the back of the truck. The last thing we did was drill a hole for a receiver pin; by then it was 6PM and time for a swim in the river.

Bumper in place with jack mounted

When I get home this evening I’ll shoot some pictures of the swingarm open and add them here for reference.

So, next steps are:

  • Pull everything back apart and clean up all the welds.
  • Bondo up any holes and sand everything smooth.
  • Etching primer on everything (POR-15 on the frame welds)
  • Some kind of black high-impact paint to finish everything off
  • Find a lock solution for the jack
  • Pick up some lug nuts for the spare
  • Find some kind of mounting solution for the license plate
  • Run wiring to the license plate for lighting
  • Mount it all back up and go!

On the Lookout…

We’ve got plans to go see some friends this weekend, starting with a junkyard expedition somewhere on the east side of town. A fellow gearhead (with British and German proclivities) spotted a yard while driving with his daughter and asked if I’d like to go scope it out. While I’m there, I’m going to be looking for a good Astro van so that I can pull the entire brake booster assembly in order to do a Hydroboost conversion on Peer Pressure. When that might actually happen, I don’t know, but I’d like to have the parts for it stashed aside.

Update: Only one Astro was located, and the booster assembly was rusty enough that I passed on it.

Posted on   |     |   1 Comment on On the Lookout…  |  Posted in Friends, Future Plans

Visitor.

Visitor

I had a fellow Scouter drop in this afternoon, who goes by Scorp1us on the Binder Planet. He’s got a body lift kit for his Traveler and has been trying to figure out how it should install, considering he currently has no hardware on his front body mounts. I had to spend most of my weekend around the house working and watching my girl, but offered Peer Pressure up to eyeball a proper installation. He just got done installing fuel injection on his 345, and showed me the whole setup, including a laptop on his passenger seat with real-time readouts from the ECU. Pretty sweet.

Traveler

He’s got a bit of bodywork to do next, starting with his body mounts, and then some rear quarter and fender work. His rig is very similar to my roommate Pat’s Traveler, which was also Tahitian Red with a 1980 grille.

IMG_2715

I didn’t get to to much of anything with my Scout other than take her to the store and to pick up breakfast, but it sure was nice to have the top rolled up. Tomorrow will be 84° and sunny, so she’s coming into work with me.

Posted on   |     |   Leave a Comment on Visitor.  |  Posted in Friends

Welded and Waiting.

Today I headed back to Chestertown for more bumper work with Brian. One new wrinkle in the fuel system saga is that filling the tank with more than 8 gallons of gas produces a mystery leak somewhere from the top (!?!?) out of sight. So when the tank gets dropped, I’ll have to sort that out as well.

Back over the bridge

The assemblies are back from the welder, and they look great. Only a few minor spots of burn-through here and there, stuff that can be fixed with a small amount of bondo and some sandpaper.

bumper mounted

We pulled the stock bumper off, put the new one on, and did some test-fitting for the jack mounts. With some silicon padding down on the cradles, we marked off holes for mounting bolts and drilled them through. Then we revisited the spare tire mount, drilling holes for mounting bolts on the plate, then mocking up the arm and re-measuring vertical distance. Both sets of bolts I’d bought from Fastenal were too long, so we had to hit the local True Value to find stock in the proper length.

Jack test-fit

Once that was sorted out, we noticed the standoff was 2″ too long, so that got chopped down to size. Then the plate was marked and tacked onto the standoff, and we tacked mounting bolts in place on everything.

Mounted and ground down (partially)

After lunch, we were still waiting for the welder to get back to us, so we busted out the grinders and cleaned up the welds a bit. Once I smooth it out with a flap wheel it’ll be ready for bondo, and then some etching primer.

Ready for welding

The welder was AWOL until the late afternoon, which screwed up our timetable, so we dicked around with some other stuff before calling it a day. First up was drilling holes for seatbelt bungs, which look real pretty and will be even prettier when they’re welded and painted.

Then we thought about tracing the power lead from the fuel sender back to the dashboard, and got as far as pulling the dashboard valance panel off and mucking around with the gauge when I came to my senses and realized I needed to be on the road in an hour. This job can wait.

So, after a quick ride in Chewbacca, I packed up my gear and hit the road for home. As I was approaching the bridge, I hit the first in a series of rainshowers and found the wipers were dead, to my great dismay. They have been working reliably up until now, so maybe our wiggling the BHC made them angry or something. I stopped in to the local K-Mart and found some Rain-X, applied that liberally to the windshield, and continued home. That shit is awesome.

Gearing Up

Tomorrow I’m headed back across the bridge for more wrenching fun with Mr. Scout. In preparation, I decided it might be wise to replace the cracked vapor line I repaired with a sock and zip tie last fall, seeing as we’re going to be welding within inches of it.

The backstory: I was putting something like fifteen gallons in the new tank and heard the sound of fuel spattering on the pavement. The original vapor line was two pieces of ancient hose spliced with a length of copper tubing, and the leaks were coming from somewhere around the splice. Pressed for time, I wrapped the leak with a sock to keep dripping gas from hitting the hot exhaust pipe and torching the back of the truck.

Finn helped me by finding the proper 9/16 socket and removing four bolts which held the spare tire assembly to the sidewall. I marked it and stored it in one of the bins, then put the four bolts back into the sidewall. It’ll be nice to drive without that thing clanking around.

Posted on   |     |   Leave a Comment on Gearing Up  |  Posted in Friends, Progress, Repairs