Wheel Talk

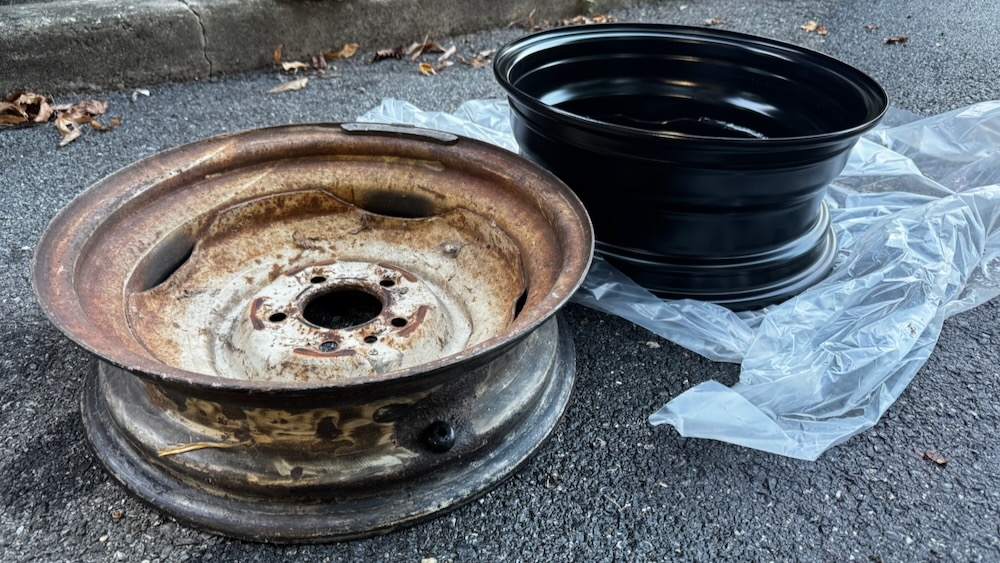
Following up on my last post, I ran out to Frederick on Sunday to pick up a pair of NIB steel 5×4.5 wheels from a nice gentleman named Tom. After measuring the backspacing and offset, I went ahead and pulled the trigger anyway—all four were only $75—but even before I fit one on the truck as a test, I knew it wouldn’t work correctly. These wheels are 6.5″ wide, and the offset is the same as the wheels I’ve got, which means there’s an extra 2″ of wheel inboard of the hubs; this means they’re too far inward to actually mount to the truck without rubbing against the body. My initial thought was that I could buy 1″ or 2″ spacers to get them to fit, but then I’d also need longer wheel studs, and that was getting more and more expensive and time-consuming. So, I discarded that idea.

But, this did give me some good information to jump off from. These wheels are made by Dorman, and they did offer other options in this wheel pattern, but most all of the ones available are direct replacements for OEM wheels and don’t have the correct offset. Some more looking turned up a set of Wheel Vintique steelies at 16″ and 6″ wide with the correct offset; the only problem is that they’re $200/ea. So this will be a save-up-for-it thing, and I’ll keep my travels local until I can make the purchase.
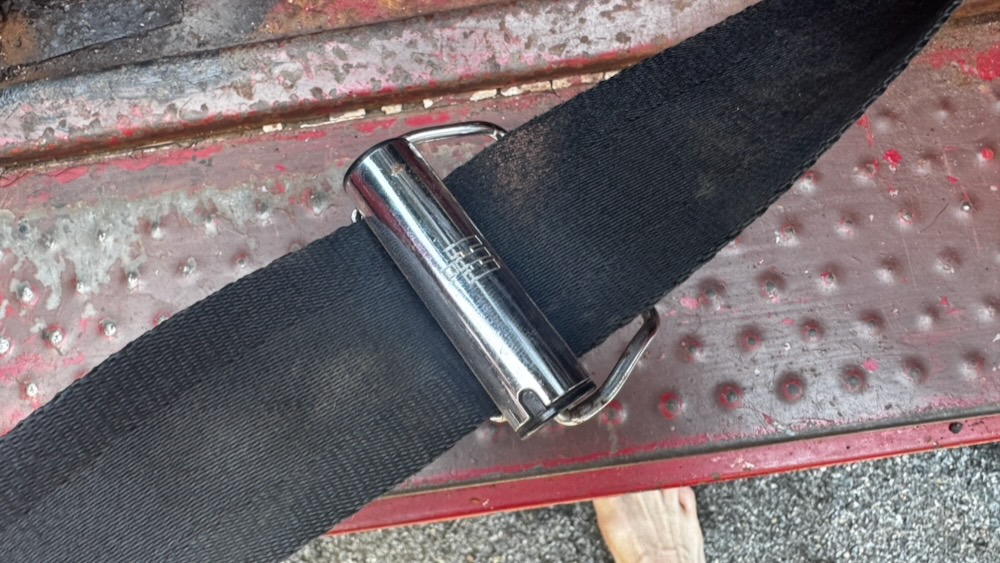
In the meantime, I picked up an OEM International seatbelt retractor from a fellow on Marketplace. Darth Haul only has non-retractable lap belts, and when I got the green truck it came with two of these retractors on the back seat. They are essentially a C-shaped springloaded device that coils up the belt when it’s not buckled. I put them on Darth up front, and they do a great job of keeping the seatbelts inside the truck and away from scraping along the pavement. Of the two I inherited, one was rusty and the metal tabs that hold the belt were weak; it works, but it would be great to have two solid units up front.

I bought a new power steering pump for Peer Pressure, which will be here Tuesday; swapping this in will be part of the weekend’s chore list so that I can keep her from piddling all over the driveway. I think I’ve got the right fittings for the Hydroboost setup, but some further research is required.

On the merchandise front, I made a bunch of updates to the new T-shirt storefront at Fourthwall, which I’m happier and happier about every day. I’ve already made a bunch of sales there—the first customer, who bought a Make Scouts $500 Again shirt, wore it to the Rocky Mountain Roundup, and within a couple of days I had three more sales from Colorado. The entire setup of this storefront is so much friendlier and equitable compared to Threadless, which was pretty much a joke. I wish I’d known that earlier.

I also set up a VERY simple page at duganheavyindustries.com and built a draft page for the cupholder. I’m still finalizing some stuff, but I’m going to put a feeler post out on a couple of the Facebook groups to see if I can generate enough interest to make the initial investment—I figure 5 committed buyers should be enough to have 10 sets made, and that will recoup the costs. I sourced the shipping boxes, so the last thing I need is some way to take payment. WordPress has all kinds of e-commerce plugins available, so I’ll have to see if that’s worth the time—or if I just do Venmo and roll the dice.

Rooftop Dreams

I’m currently gathering all of my camping equipment to take the kids on a trip up to a park in Pennsylvania, and I’ll be packing the Scout. This is not a problem; I love taking the Scout on adventures. But my end goal for the Travelall has always been to make it a proper touring/camping rig, and one of the things on the list is to install a rooftop tent. Marketplace seems to be lousy with used examples, and while I’ve been tempted to buy one lately, I know I’m still at least a year away from being ready. For one thing, I still don’t have a platform built to mount a tent to, although I have the aluminum channel ready and waiting for a date with the TIG welder.

That’s not to say I haven’t been doing my homework. I’m looking for a hardshell model, for several reasons: I don’t want a big flappy bag on the top of the truck slowing things down, I don’t want something that will require a PhD and a 2-hour video to install, and I’d like to have a place to mount solar panels to charge the battery and plug stuff into. I’ve seen several different options from multiple manufacturers, and over the weekend I stumbled across a listing for a Naturenest Polaris Plus on Marketplace. This seems to tick all of the boxes I’m interested in: it’s light, it’s a hardshell, it packs down small, and it’s outfitted with some thoughtful amenities—an external cooler-heater vent, USB plugs, lighting, and external racks to mount other gear upon. This looks like a strong contender—and the price is reasonable.

Posted on   |     |   Leave a Comment on Rooftop Dreams  |  Posted in Future Plans

Re-Ignition

Good news: the Travelall is running again. I did a quick inventory to see how many ignition switches I’ve got, and it turned out I have five. One from the original truck, one from the replacement harness, one from the green truck, one from the Scout 800, and one NIB unit. The switch I was using was the one from the replacement harness, which had worked fine up until this problem. When I pulled it out the other day, the lock barrel was spinning freely inside the switch, which meant that nothing was making a connection inside the switch to send signals to the truck. Last weekend I went over to the 800 in storage, pulled the NIB lock barrel I’d put in that, and brought it back to the bench to swap in the lock barrel I have a key for. Putting it in the truck, it started, but something inside was sticking, keeping the starter grinding, and pulling the key back killed the engine.

Locksets

So I went through the other switches. I cleaned rust off the connection blades off the Scout 800 switch, scrubbed it with electrical degreaser, and shot it full of WD-40.  The barrel went in perfectly, and the truck fired up and ran without a hitch. This switch is probably the original USA-made unit from 1967, was sitting out in a field for 15+ years, and worked flawlessly. The new unit I bought seems to be faulty, which tracks with a lot of comments I’ve been hearing about the quality of new parts lately.

Out on the road, the truck ran fine—she was upset because she hadn’t been run up in two weeks, so I had to warm her up—but once we were moving she was fine. I’m still getting a ferocious wobble at about 55mph, which I haven’t tracked down yet. I put a camera on the passenger rear tire, which looked pretty steady; I’m going to put cameras on the other three tires this weekend to see if I can pin down the source.

Scout II Fuel line diag ram

This weekend I’m going to pull the rear wheel off the Scout and see if I can sort out the evap/emissions gear in the rear passenger fender; I’d pulled it all out when we swapped the poly tank in 15 years ago like a dummy, but looking it over on the bench and comparing to the service manual, it’s clear some yee-haw got in there and butchered the original connections. I bought some new fittings and fuel hose from ACE last weekend, and I’m going to attempt to re-install the system the way the manual specifies. I’m actually considering dropping the tank completely to re-install the sender gasket; we’ll see how ambitious I feel tomorrow.

I’m also going to shoot the entire steering box/pump with oven cleaner to degrease the entire unit so that I can figure out where it’s leaking from—and pin down my next steps for that issue. New boxes are $600 before shipping, so if it’s something simpler than that, I’d be very happy. But I doubt it. Thankfully I’ve got a spare in the garage for the core charge.

Posted on   |     |   Leave a Comment on Re-Ignition  |  Posted in Electrical, Future Plans

Prep for Nationals

I had a busy weekend moving and shaking with truck stuff. The first task was to drive down to northern Virginia for a cheap used Bestop soft top I spied on Marketplace. Saturday mornings are the perfect time to get around Washington to avoid traffic, and it took just one hour to pull into the seller’s driveway. He was cleaning out his house in preparation for a sale, and had pulled the top down out of the garage attic for the first time in decades. All the parts were present and the fabric and plastic were in excellent shape, so I made the deal and headed home.

Bestops are different than Kaylines in that the mounting hardware is a completely different design, so I’m not interested in keeping this one, even though it’s in excellent shape. I opened it up, made sure all the parts were there, then shot pictures and put it up for sale on the Binder Planet. I’ll drag it to Nats to see if anyone wants to drive home with it and hopefully make some more gas money.

Then I drove over to the local U-Haul location and hitched a tow dolly up to the Scout. Once again I’m thankful that the previous owners did a great job wiring the truck up, including a tow harness. After getting it home, I backed it up to the 800 and did some thinking on how to get the truck onto the dolly. The first and easiest solution was to drop the battery from the Travelall into it and use the starter to crawl it up onto the dolly, but the starter is old and tired and couldn’t make it all the way up the ramps. So I put the tow strap on and used the Travelall to yank it up onto the dolly where I could get it strapped in place.

I had been nervous all week about towing the truck, but after some initial starts and check stops (I had to use a ratchet strap to hold the tailgate closed) I made it out to Brian’s with no issues. Peer Pressure pulled just fine, and apart from the engine getting warmer than usual I had no problems. At Brian’s, we puzzled out how to get the 800 off the ramp, down the driveway and into the garage, and settled on pulling the dolly out from under the front wheels. Then we let gravity pull the truck down the driveway where I did a 180 and lined it up to roll backwards into the garage bay.

With that done, I pulled the CR-V up onto the dolly, strapped it down, and headed for home. Again, Peer Pressure pulled it easily, and after dropping the Honda off and returning the dolly, I took the Travelall back out to Ellicott City for some dinner and a speed run up Rt. 40. The wheels are still vibrating badly up front, so hopefully the shop I’m taking it to on Wednesday can help me balance things out.

Sunday I did a lot of prep work on both trucks to make sure they’re both ready for the drive. I cut some 1/4 allthread down and made a battery hold down strap with a length of aluminum on the Travelall. Next, I pulled the front tires off the Scout and lubed the suspension up for the first time since ever. While the passenger wheel was off I finally replaced a section of rubber fuel line that was rubbing against the brake line as well as a filter between the pump and the carb—both of which date back to the previous owner. I tidied up wiring in the engine bay and along the frame rails, cleaned out the cabin, and topped off the fluids. On the red truck I did a lot of the same, as well as adjusted the timing and idle a bit to combat some dieseling I was getting at shutdown. I also tucked the rearmost section of headliner from the green truck up into Darth, grounded the dome light, and hooked it up to the circuit so that there’s a working light over the barn doors.

Posted on   |     |   Leave a Comment on Prep for Nationals  |  Posted in Future Plans, Travelall

Preparations

We’re only two weeks away from Nats and I’m feeling the date bearing down on me. I really want to drive the Travelall but haven’t been able to get her out for a long drive yet. The weather finally broke today and we got the first sunshine in a week, so I can hopefully stretch her legs this weekend at some point. I made an appointment with a local independent shop next week to have the wheels re-balanced and balance beads added, so we’ll see how that affects the ride. In the meantime I have some small things to attend to:

  • Fabricate a battery hold-down. This just requires a length of allthread, an aluminum strap, and two wingnuts.
  • Order a set of hoses. I need the top and lower radiator hoses just in case she gets too hot on the trip. I thought I had some used spares in the Scout bins—I’ll have to double-check this.
  • Fabricate some kind of temporary mount for the Rotopax. I figure I can make something to bolt onto the spare tire to hold the gas can upright.
  • Put together the emergency kit. Most of my stuff is already together, but I need to add some truck-specific things.
  • Lubricate the chassis. I haven’t done this yet, mostly because both of my grease guns are broken. I did, however, find a working grease gun at a yard sale two weeks ago, so I’m gonna get the old girl all greased up.
  • Re-torque the U-bolts on the springs and check the tie rods. Basically just make sure nothing has decided to jump ship.
  • Check and top off all the fluids. 
  • Replace the fuel filter.
  • Hose the windshield down with Rain-X. I have no windshield wipers. If the forecast is anything like it was two years ago, I’ll probably take the Scout, which at least has some wipers.

I’ll repeat everything here on the Scout except for the first three items, just so I’ve got the backup ready to roll.

Posted on   |     |   Leave a Comment on Preparations  |  Posted in Future Plans, To-Do List

Re-Organization

Memorial Weekend was damp and rainy, so I wasn’t able to do much outside, but I did take advantage of the time to re-re-re-organize in the garage. After erecting a set of racks for my Home Depot totes and immediately filling them all a few months ago, I quickly realized I needed another stack. So I cobbled together the rest of my spare lumber and put a second stack together, which required moving a bunch of other crap out of the way. By the end of Saturday I’d built and filled the new stack, raised the old kitchen cabinets on the back wall higher, moved the fridge underneath that, moved the second pair of spare Scout doors out under the back porch, and shifted a bunch of other stuff around to make more room. Then I consolidated some of the parts in the tubs and updated my parts spreadsheet so more common items are together. There’s still a long way to go, but I can get to it all much easier.

On the trucks, I did dumb puttery stuff like install the V7 cupholder (verdict: perfect!), swap the refinished passenger fender onto the truck to church it up for Nats, and tightened both fenders down securely. I pulled a bunch of parts down out of the attic to see if there’s any interest in Ohio—this is stuff they’re not currently reproducing—and stuffed them into a bin for the trip. And the floor is bolted down with more hardware.

I’ve been chasing the issue with the fuel gauge for a couple of weeks now. I tested the sender and found that it was sending, as well as the gauge behind the dashboard. Doing some more digging, I realized there’s another thing I hadn’t considered: I most likely fried the voltage regulator when I was welding on the truck in the fall of 2024—the same thing that fried the condenser on the distributor. I pulled the original off the truck and swapped in a used spare from the green truck, but that did nothing. The Jungle site overnighted me a new one, and after swapping it and the original blackface gauge back in, I was rewarded with a working unit again! Now I just have to drive it around for awhile with a jerry can in the back until I understand what it considers empty and full.

Friday evening I got a message on the Binder Planet from a guy in South Carolina who read the site here and was wondering if I still had any spare Kayline hardware in my collection. After trading some messages and an email, I sent him pictures of what I had and we struck up a deal. He’s one of the rare examples of someone who has an intact canvas top but only some of the mounting gear—I’ve come across piles of hardware made obsolete because the canvas was shredded. Along the way I’ve rescued a number of these spares, and I was happy to pass them along to him. I made a sturdy box out of some spare cardboard and shipped it off to him Tuesday afternoon.

Weekend Updates, 3 Days Later

I got the steel wheel back from the repair shop yesterday, and it looks much better than it did before. I put it on the front hub and spun it to see how straight it looked, and while there’s just a little side-to-side variation it’s not as huge as it was before. This morning I took her out for a test spin, and when I got up to 55mph I did feel a shake—but not as bad as it was before. At 60-65mph it smoothed out and ran like a champ—the engine was happy at that speed and she felt stable and true. So I think I might swap the newly repaired tire to the front, put a camera on both wheels and see if I notice any vibration at speed. If there’s another wheel that looks bad, I’ll get that one repaired as well. And if I need extra balancing, I’m going to take it to a tire shop and have them add balance beads to each wheel.

Three years ago, after I’d pulled all of the carpet off the interior of the truck, I was left with a bunch of adhesive all over the bare metal. Later on I used a rubber-brush wheel on a drill to knock all of that residue off—the ancient adhesive resisted acetone, and I didn’t want to use anything stronger than that—which left a dull finish on the metal. I did a test run with the cutting compound and found that it brought the shine right back, so I spent Sunday afternoon going around the perimeter of the interior and cleaning up the metal, including the doorframes. It looks a million times better inside.

I also pulled the original steering wheel off and replaced it with the one I refinished a year ago. I had to clean up the threads on the new wheel and sand paint off the copper horn ring, but it went on with no complaints and the horn works fine. Interestingly, there is a turn signal cancelling mechanism in there, but one of the contacts was broken years ago. After a test drive with the new wheel, I found that the left turn signal will now cancel, but the right side won’t. I’m going to see if I can source a new mechanism at Nats.

The outside paint is…better than it was, but nothing short of a full sanding job is going to get it to look any better. The cutting compound knocked all of the oxidization back, but the patchy nature of the original paint, remainder of the clearcoat, my bodywork, and rattle-can IH red gives it a true farm-implement look. Thankfully, the fresh paint on the roof and wheels plus four shiny hubcaps make up for a lot of these sins.

On Tuesday a replacement fuel sender showed up, and I started testing it. Using a multimeter, I tested the new sender to make sure it was working (using the Ohm setting, put test leads on the body of the sender and the contact point, and move the float arm. The reading should rise and fall based on where the arm is) and then working backwards from the tank, tried to isolate where the signal was dropping. It got dark very quickly so I wasn’t able to get very far, but I’ve got a plan for how to proceed.

SendCutSend tells me I’m going to have two modified cupholders in hand Thursday, which I’ll weld up for Nats. The goal there is to show them to Light Line vendors to see if they’ll distribute them for me. I’ve done some basic math, and I figure I can make some decent money producing these in volume if I get enough interest.

At Harbor Freight on Saturday, I happened to spy a speed controller box designed for a router. Essentially a potentiometer wired in between power from the wall and the tool, it’s meant to slow the router speed down. This is exactly what I need for a circular saw cutting steel or aluminum, so I grabbed it and a 10″ aluminum blade for the DeWalt miter saw my brother-in-law sent me home with last Christmas. I gave it a test run with some of the aluminum channel I bought last fall, and it does work as advertised, although it pops the 8V fuse on the back of the box. I’ve got to see what the draw from the saw is, but I can’t imagine it’s any more than a router would be—the Porter-Cable unit I’ve got is a monster. I’ve got a box full of glass fuses for the Scout so I can mix-and-match until I get something comfortably between constant tripping and nuclear meltdown.

The test cuts I did worked pretty well. My idea is to do a carpentry-style set of pie cuts to allow for gentle 90˚ rounded corners, which would then get welded solid after they’re bent. I’m going to need to be surgically precise on these, as well as find a way to lay things as flat as possible for the straightest joins. I bought extra aluminum to practice with, but I figure this is going to take some time to do correctly.

Slow Progress

I’m currently waiting on a local shop to straighten out the new (to me) steel wheel, so I put the 15″ wheel that came with the truck back on to putter around the neighborhood. While I’m waiting I took care of some small stuff in the driveway.

All four of the cargo tiedowns are countersunk into the rear floor and mounted securely with a steel plate underneath, which means I have two mounts for seatbelts and two for cargo in the rear of the truck. The 800 came to me with four removable seatbelts, so I pulled one of the female seatbelt sides out, soaked it in detergent, and scrubbed the lichen and dirt out of the webbing with a toothbrush. That will make the final pair complete, and I can belt in four people safely.

I’ve spent a number of hours with a buffing wheel and cutting compound, trying to bring the original paint back. It’s been hit or miss, because the paint is in such lousy shape across the truck, from clearcoat to bare metal with about five layers in between. I can’t get the paint to polish evenly, which has been very frustrating, and I may just give up on it.

Last weekend I bought a sheet of 4×8′ lightly textured plastic meant for use in bathrooms to try out as headliner and cut it down to fit over the driver’s seat back to the second bow. Unfortunately it’s not quite the size I need: It’s 50″ between the border lip above the sunvisors to the middle of the second headliner bow and I’ve only got 48″ so the edge doesn’t hide neatly, and the material is too saggy in any case. I’m on the hunt for some kind of fiberboard that would be malleable enough to bend on the sides without breaking, but I haven’t found the right stuff yet.

And, I measured and ordered a set of CocoMats for the Travelall. I’m really happy with the ones I bought for the Scout, and I figure any sound abatement/heat insulation in the cab will help this summer, at least until I can get air conditioning installed. Hopefully they will arrive before our trip to Nats.

Here’s the Nationals to-do list, if I get the Travelall sorted out:

  • Fix the driver’s headlight, which has stopped working. I think it’s because the battery has landed on the connector one too many times. Fixed: The connector had come undone. 
  • Sort out the wheel situation. I’m going to see if someone local will add balancing beads to the tires, and maybe that will help at speed.
  •  Order and weld up two adjusted cupholders from SendCutSend. I’m shortening the arm by 1″ to pull them away from the shift lever so that shifting into second gear doesn’t slam into my coffee cup. With that, I’ll be ready to show them to some of the Light Line vendors at Nats and maybe set up a distribution channel. Done. I’m much happier with this design now.
  • Swap the clean passenger fender on to the truck. I’ve been running the original, which had some crude bodywork done, but the spare in the garage is in really good shape, so I think it’s time to re-hang it. Done. It really cleans up that side of the truck.
    • For that matter, the fenders need to get bolted on more permanently, at least for the drive to Ohio.
  • Swap the new steering wheel on. That’ll clean up the interior even more. Done. It looks great.
  • Fix the damn fuel gauge. As I’ve mentioned before, it did work at one point, so I have to chase down the issue with either the wiring behind the dash or the sending unit itself. Done! It was the voltage regulator, and fixing that also seemed to make the ammeter happier to boot.
  • Check all the fluids.

And if I take the Scout:

  • Replace the temp sender, which has stopped working. I’ve got a spare ready to go in. Done. And I found a bag of used senders in my stash, a few of which will go in the travel parts kit.
  • Check all fluids
Posted on   |     |   2 Comments on Slow Progress  |  Posted in Future Plans, To-Do List, Travelall